Showing posts with label diy. Show all posts

Monday, July 13, 2015

I'm back! And Ramadhan will be over in few days. Speaking of Eid, I usually give some present to my both Grandma and my Quran teacher. This year, I'm too lazy to buy the money packet / envelope because mostly they don't have nice design. So, I decide to make it my self and start googling. I found some nice designs.

See how cute those money packet! Here's the link 
  1. Sampul Duit, the Malaysian version of polkadot design from www.inmystudio.com.au 
  2. Eid Money Pocket, the English version of polkadot design, also from www.inmystudio.com.au
  3. Money Packet, Elegan design from www.inmystudi.com.au. She have one package, including poster, lantern and bunting flags decoration with the same design. They also have the new design with pink and balck colour ;)
  4. Sakina Eid Envelope - Ocean, bigger envelope for adult in ocean colour from www.sakinadesign.com
  5. Sakina Eid Envelope - Plum, bigger envelope in plum colour from www.sakinadesign.com
You might see slight different colours in my picture. Yes! It's different colours, but I didn't edit it, it just the printer. I guess I ran out of red colour, so it turn out more colourful for the sakina envelope.
But, I'm happy with the result. The colours is bright! 
So, I wish you all bless for the Eid, happy 

Eid Mubarak!! Taqabbala allahu minna wa minkum. May Allah accept from you and us. 
speak soon,
Ninu


Thursday, December 18, 2014

Back! Haha! As I promise on my latest post here, Now it's time to show the look of my toothless amigurumi. Tada!!! Finally finish my toothles amigurumi just in time! I plan to take toothless to Japan. So, here's the final result for my Toothless amigurumi.

It's a little bit hard to find safety eyes in local store here, but I finally found one, and I got the right colour for Him! I also add eyelid, so he will look more masculine :) I also fix the horns and ears and add pinky nose.

Let's go to Japan Toothles!!

speak soon,
Ninu

Friday, August 22, 2014

After years of break from crocheting, this is my "first" attempt to make lace crochet. I was strolling on pinterest and saw cute crown brooch and deciding to make one. I found this cute Royal Baby Crown pattern from Sarah london blog.

So here's the pattern!

source
Royal Baby Crown
Ch 13.
1st Row: Work 1 dc Work 1 dc into 2nd ch from hook, work 1 dc into ea ch across, ch 1 turn.
2nd Row: Work 1 htr into ea dc across, ch 1 turn.
3rd Row: Work 1 dc into ea htr across, turn.
4th Row: Sl st across first 2 sts, * ch 3, miss 1 st, work 1 dc into next st, rep from * 3 times, sl st across remaining last 2 sts, turn.
5th Row: Ch 6, work 1 htr into ch-3 loop, ch 4, work 1 htr into next ch-3 loop, ch 6, work 1 htr into next ch-3 loop, ch 4, work 1 htr into next ch-3 loop, ch 6, sl st into last st, turn.
6th Row: Work 6 dc into ch-6 loop, work 4 dc into ch-4 loop, work 4 dc, ch 3, 4 dc into ch-6 loop, work 4 dc into ch-4 loop, work 6 dc into ch-6 loop.
Fasten off.
So, this is my result. It might look different, actually it looks different (mine look ugly, haha!). I don't know why, maybe because of different yarn, or it just me didn't do it really well. But overall it's ok-lah. I decide to attach it on bobby pin and it looks good on my hair ^_^ You can also use it as brooch too!

So waht do you think?

speak soon, 
Ninu

Friday, August 15, 2014

After finishing the pony amigurumi, like I said before on my last crochet post here, I will make another amigurumi. This is the first complicated amigurumi I ever made, and I already made a deadline to finish it (before Ramadhan ends). 
Like I said before, I want to make dragon amigurumi. After searching for some free pattern, finally I fell in love with this cute Toothless amigurumi by Sarselgurumi. At first, it seems complicated (it is complicated!), because I have to make lots of part of the amigurumi and find out some stitch I never done before. It took some time to make all part, but it WORTH it! I even have to do the tail and wings couple times (the wings pattern is the most complicated one, because I never do foundation stitch before).

Here's some progress pictures since I start it last month. Start with the head and body and continue with the feet and tail. If you confused reading the pattern from the Sarselgurumi, you can check this link here for pictures tutorial based on Sarselgurumi pattern. The feet look cute with those fingers :)
This is what happened when I keep distracted while crocheting XD. The ears didn't have the same length, so I have to start over again. I made mistake in row  9-14. Hehe! 
 So this is the progress so far minus mini horns, wings and tailfins
Here's how it look with the horns. I haven't attach the head to the body, because I think it will be more easier to attach the upper parts to head and the lower parts to the body before attaching head and body.  

Last but not least, I finally finish the hardest part! Yes! The wings! And I directly attach it to body right after I done it. See how nice the wings are :) 
And here's is the final result! Everything already attach to it places :) Except the eyes XD. I want to use safety eyes, but so far can't find it here. Maybe I should order online.

Ow, one more thing, I did change the way to attach the back feet. Because I want my Toothless be able to stand. So I attach it just like the way I attach the front feet. This how it look when standing :))

So, you must be wonder why I choose that blue yarn instead black or dark blue yarn. Because I only have that yarn at the moment, and I can't wait to buy new yarn! Hehe ;p I can't wait to put the safety eyes and see the final result!! 

Speak soon,
Ninu 

Thursday, July 3, 2014


I have been obsessed with ombre lately, it starts since I did ombre to my hair and then new get ombre stuff like obre shirt. I've been seeing nice ombre nail art, but I don't get a chance to do it my self. Last week, finally I tried to do ombre nail art. Here's all you need to do DIY Ombre Nail :

  • Nail polishes (two or three colors), I choose these three colors (Dark blue, White Pearl and Yellow/Gold)
  • Sponge, cut into your nail size - Unused sponge also good ;)
  • Nail remover, to clean your nail tip
  • Cotton pad and cotton buds


How to :
  • First, cut the sponge to your nail/finger size if your sponge too wide. Unused sponge will be good because you will only your this sponge one time.
  • Next, dabbed the nail polish one by one (I already use the sponge to do trial before taking pictures ;p)
  • Here's the fun part, dabbed the sponge into your nail like two or three times or until you satisfy with the color. Don't worry if you messed up, we will clean it up later.


  • When you done will all the fingers, take your cotton pad or cotton bud to clean up your nail tip. 
  • Last, don't forget to use top coat, to protect your design ^^ You can add some nail art, like flower or something before the top coat. I decide just to make it simple this time ;) 


Done! You got nice ombre nails! Easy! ^^ So, don't worry, let's try it, it's super easy only took like 5-8 minutes to do with all the fingers. So what do you think?? Let's do it!! 

Love, Ninu


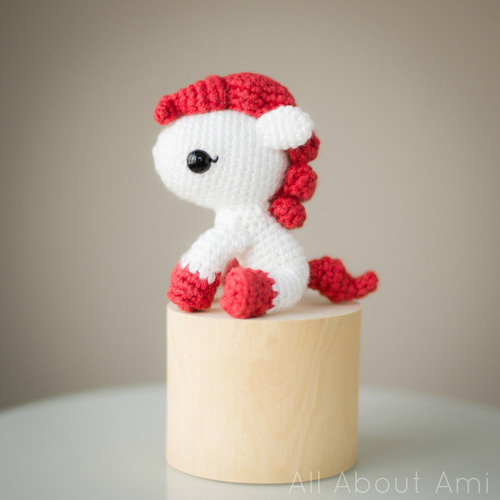
Ramadhan Mubarak!! Finally I finish my second amigurumi!! Yay! I haven't crochet anything since I graduate from university (about 6 years!) Few weeks ago I was trying to make boots for Baby Z, but eventually I always make wrong size (it was 3 times trial!) and I finally gave up on that boots. Baby Z's feet just too big :p I was looking for bookmark free pattern and I found this cute little pony on Stephanie's blog
Source
It's super cute! And finally I finish it! ^^ And by the time I finish it, I just realize that I make it in the "wrong side". That's why the feet not flatten XD Haha! But it's ok, it still look cute! I also add flower button on her ear ^_^

I was struggling to join each pieces, and some part of the join look rough, Haha! I'm just beginner ;p I think this is a good activity in Ramadhan ^_^ while waiting for breaking fasting or when you have nothing to do at work ;p Next project is.. dragon amigurumi! Need to get the stuff first. 

So what do you think?? It looks cute right?? What should I name her... ?? Do you 

Love, Ninu

Friday, June 20, 2014

Since I order my Manduka mat, I've been thinking to make my own yoga mat bag ^^ I don't really like my old yoga mat bag that got from my old mat. It have a hole on the top and use small strap, it hurts when you have heavy mat XD. So, I google it, trying to find inspirations and nice free pattern. So finally, I decide to use free pattern from Nigella Yoga Bag. You can just follow the instructions on the that pattern. But I decide to make my own version and use the pattern as guidance. 

So here's the supplies : 
  1. Denim & Inner fabrics
  2. Old Zipper from unused bag (I decide to use zipper instead let the upper part open)
  3. Unused leather straps 
First thing to do it cut the fabrics. I use denim (Yeah! The same fabric as my pleated skirt) for the outside and the grey fabric for the inner part. For the measurement, I just follow the pattern and I add the top circles part. I didn't cut the denim fabric for the outside pockets, because I was thinking to use other fabric to give more pattern, but I still cant decide which fabric I want to use for the pocket. So, I skipped the outside pockets part and add a small pocket for my phone inside (with the grey fabric).


Let's start sewing! The first thing to do is putting the zipper. It's a little bit hard for me, because I usually use invincible zipper and this one it's not that kind of zipper. First, I stitch the zipper to the denim and the stitch again with the grey fabric on the top of the zipper. 


So, here's the result for one side of the zipper. I'm sorry becuase I'm not good explaining it in English ;p but I hope you understand what I mean. 

Next, before do the other side of the zipper, I need to stitch the inside pocket. I just realize that I cut the pocket part too small XD so I decide to serge (overlock) it.


Then pin it on the grey fabric (I deicide to put near the top of the bag, so my phone wont slide down when I carry the bag) and stitch it.

When you done, you can continue to stitch the other part of the zipper. And you will get a tube shape. Next, prepare the top and bottom part. Mum suggest to give hard fabric between the denim & grey fabric (I don't know what it's called). But it will make your fabric stay in shape (it's like the inner part of you collar). Too bad that hard fabric is not the one can stick to your fabric by ironing it. So I have to stitch it, so it wont moving around when I put it together with the tube part.


I have to stitcth the leather strap before joining the top & bottom part to the tube part. I decide to use the black leather strap. This is the hardest part, because the leather strap is thick. When you done with the strap, it's time to join the top & bottom part to the tube. Too bad I didn't take picture, but just follow the instructions from the Nigella pattern. 

You can serge the bottom and top part when you done of just leave it like that (it's inside anyway, noone can notice it ;p). You might notice that the zipper looks different, yes! It's because I change the zipper head to match with the copper accent on the black leather strap. Done! Now I have my proper yoga bag for my Manduka. Happy yoga time! Namaste. 

PS : I might reconstructing this bag, because the leather strap it's not good, I guess it will peel off soon and I might need to fix some of the stitches, rearrange the inside pocket and add the outer pockets.

Love, Ninu

Thursday, June 19, 2014

Few days ago, when I was looking for gift idea and I found this lovely Metal Hand Stamped stuff. I was thinking to buy it online, but it's bit pricey, and I think dad have that metal stamping tools at home. So, next I'm reading some blogs about how to make it your self and it looks easy ;p
source
Then I look more hand stamped stuff and everything just seems look nice. I want one! For sure! This will be nice person because you make it your self.
Source
I decide this will be the gift! First thing to do it, ask dad where he put it. Haha! I remember how he stamped all mum's baking pan with my name ;p Even some spoons have my name on it. This is would be fun weekend project ;)

Last night, I was searching that stamping letter in dad's storage. It was in small blue boxes (there are two boxes, one for letters and one for numbers). When I check it, it's already rusty XD but dad said I still can use it, and I can clean those rusty too. Since that stamped is really old (I think dad have it before I was born ;p) the letters only in regular caps font. I have no other option, maybe next time I go to hardware store, maybe I can find one with nice font. 

I was soo excited! I'm looking everything in the house, something metal that we don't really use, but I can't find anything. Until dad say, why don't try on mum's baking pan (haha! again! ;p) I took the small baking pan (mum have like twenty like this one) and dad show me how to do it. So, here's the first trial result ;p I didn't use black marker on it, consider mum will need this baking pan ;p It says "Practice makes perfect".


I think I should get some metal plates, or washer :p That's the easy one, because I don't know where I can get blank metal plate. So, if I'm not too lazy, I will buy some washer or blank plate (if I can find it) this weekend. ^^ Do you want to try to make your own hand stamped stuff?

Love, Ninu


Tuesday, April 29, 2014


Long time ago, I got a dress, which I think it look nice. This yellowish batik dress, actually look gorgeous on the mannequin, lol. I like the pattern and the color combinations, but I rarely wear it (only two times since I got it). It is absolutely way too big for me, even the obi help to hide the big size. And the worse, it's too long for my height, lol. Make me look more short XD. So, I think I should do something with this dress, or else I would never wear it again. Mum suggest to give elastic band on the waist, so the dress will fit me and the obi didn't move around.

One day, I was looking for sewing tutorial and found this lovely convertible dress idea, from extrapetite.com. I was thinking this idea will be great for that yellow dress. I was too afraid to cut the dress into two part, so I start with trying to put zipper on the left side of the dress. I want to see how it looks like when it body fit. 

First time putting zipper, messy ;p
2nd time, better
Just add zipper on the side
Here's how it looks like after I put the zipper. Look better! So, I decided to reconstructing this dress. First, I have to measure the skirt lenght, and how much fabric I have. And have to measure the pleated size, so I don't make mistake when I cut the dress into 2 parts. 


After getting 2 pieces of the fabric, I just follow the instruction just like when I make my pleated denim skirt, in the other post here. I use the oby as the waist band, so it will match with the pattern on the arm. And here's the transformation look. More fit to body, and the important thing is not make look drowning in it ^^. 

The transformation

Since this is convertible dress, I can wear it with another top, just like this one, with black t shirt. 
with black tshirt

With a black belt


So what do you think? Need to do reconstruction to old dress? ;)

Love, Ninu