Tuesday, January 28, 2014

On March 2013, I got a chance to have holiday in South Korea. It is one of my biggest dream in my life, visiting the Ginseng country. The adventure start when I got a return promo flight one year before (2012). Everyone think I'm crazy, because you don't know what will happen next year. So yes! I was gambling to pursue my dream. And the day is coming, March 28th 2013, flight from Balikpapan to Kuala Lumpur at 5 pm and in 9 hours we will be in South Korea! Yay! I make my own connection flight, since there's no connecting flight from Balikpapan to Seoul. The flight to Incheon depart at 1 am, so my sister and I just go around the KLCC. I was glad that our flight from Balikpapan rescheduled, so we only wait like 5 hours in the airport (first plan supposed to be 10 hours ;p).
My hearts beat so fast on that night, still cant believe my self, I will spend two weeks in South Korea. This is first time I fly so far with a big plane. So, 6 hours in plane, I just trying to sleep. We finally arrive at 8 am. Incheon, one of the greatest airport in world, and i have been there! Hehe, super big, super clean, good directions, nice officer, everything just so perfect! 


I was still amazed with the airport and we almost lost, Haha! So we just follow the people from the immigration check, to the airport train. Ow, we meet Indonesian girl, she was standing in the wrong line on the immigration check (for Korean ;p) because one of the officer tell the people to move to other counter so they don't make long line. She was with her friends, and they join a trip from travel agent. She was amazed that we (me and my sister) go alone, backpacking, with no tour guide. Haha! This is not our first time ;p

One hour later, we arrive in Seoul station. The plan was, look for food, then go around to myeong-dong (if I'm not mistaken, i forgot). We got a little trouble, because we can't find free wifi in Seoul Station and my phone about to die. I was trying to contact all my Korean friends, but too bad they not in Seoul. It was freezing, and we both hungry, most of restaurant was full, as we walk around the station, we find lottermart, and finally find warm place to eat. So, this is my first meal in Korea, Seafood Friedrice (Haha! Soo Indonesian). And my sister got a big bucket of seafood noodles.

First meal in Korea!
As you can see, they serve big meal, yeah Korean have big meal. We can't eat all, from this we learn, just order one Korean meal for two of us ;p. After filling our tummy, we go back walking around Seoul station, looking for place to charge our phones. And the only place I see, is lotteria, they have some place to charge the phone, but that place soo crowded. It was around lunch time. We I saw the place is unoccupied, we walk inside to secure the place ;p Haha! And i order food, I guess the waiter will kick us out if we don't order anything. Done charging, we decide to exchange out KR-Pass and get KTX to Busan. We take the 4 pm schedule. And we decided to put our backpack in lockers and walk somewhere. It was only like 1 hour, because we have no where to go to, and decide to change the train schedule to 3pm. And it was like 15minutes before departure, and we almost lost to find the right train. Running with heavy backpack, Haha! But we finally didn't miss the train, and can sit down, relax in warm place, and have wifi all the way to Busan! Awesome!

That was our first meal in Korea, what about yours? I will continue our next trip to Busan soon!

Love, Ninu

Monday, January 27, 2014

Happy Monday!
Last weekend I decided to make something, and I end up cooking simple food that everyone can do, Fried Rice! I know there are lots of fried rice recipe out there, but this is my other experimental recipe, I add some stuff that they usually not use in Indonesian fried rice. Here's the recipe


Ingredients

  • 4 cups Cooked rice, don't use "hot" rice or it will sticky
  • Meat balls, depend how much you want
  • 1 Onion
  • 4 cloves Garlic
  • Pinch of Blackpepper, Redpepper, Salt
  • Sweet soy sauce
  • Tomato Ketchup or Spicy Ketchup
  • Meatballs
  • 2 Eggs, beaten
  • 4 chilies, sliced it, more chili more spicy
  • Spring Onion
  • Sesame oil
  • Coconut oil
How to :
  1. Slice the onion, spring onion, chilies and meat balls into thin slices. Chopped the garlic, I prefer to use grater (more faster), I use cheese grater ;p
  2. Heat up the pan in medium, and add a little coconut oil and sesame oil. Stir fry the beaten egg, just like when you make scrambled egg. Then when the egg already cook, add the garlic, onion and chilies. Stir fry until it smells good and then add the meatballs.
  3. Add the rice, mix it. Add soy sauce, tomato/spicy ketchup, blackpapper, redpepper, salt, and mix it well. If you want more sesame flavor, you can add a little bit more sesame oil on this step. And last add the spring onion. Done!
If you don't want to use meat balls, you can change with anything you want, like shrimp, chicken, sausage, squid or even fish. ;) 

Note : sorry, because i didn't do the right measurement of the ingredients, I'm just free-styling, hehe

Love, Ninu


Finally, I decided to bake after seeing bunch of recipe on internet. I want to bake lemon cake, and I found this recipe on Stephanie Jaworski website, Joy of Baking, Lemon Frosted Cake. Here's the original recipe from Stephanie, I only make half of the recipe, because I got the wrong butter XD (I got creamy butter)

My first lemon frosted cake!


Lemon Cake Recipe

230 grams unsalted butter, room temperature
200 grams granulated white sugar
1 teaspoon vanilla extract
4 large eggs, room temperature
Zest of 1 large lemon 
260 grams all purpose flour
2 teaspoons baking powder
1/4 teaspoon salt
60 ml fresh lemon juice


Lemon Frosting :
115 grams icing sugar
2 - 4 tablespoons fresh lemon juice

How to :

Lemon Cake 

  1. Preheat oven to 180 degrees C and place oven rack in the center of the oven. Butter, or spray with a non stick cooking spray, a 23 cm spring form pan and then line the bottom of the pan with parchment or wax paper. (I use small rectangle baking pan, i don't remember the size, just anything pan who can fit)
  2. Beat the butter and sugar until light and fluffy and in pale color (about 3-4 minutes). Beat in the vanila extract (I skipped this, because i just want lemon flavor). Add the eggs, one at a time, mixing well.
  3. Sift together the flour, baking powder, salt and lemon zest. Add the flour mixture (in three additions) alternately with the lemon juice in two additions (I forgot this part, so i just add it at the end), mixing until you have a smooth batter.
  4. Pour the batter into the pan, smoothing the top with spatula or spoon. Bake about 40-50 minutes, or until a toothpick inserted in the center comes out clean. Do not over cook or the cake will be dry (I guess mine a little bit over cook ;p). Then cool the cake for 15 minutes.

Lemon Frosting

  1. Place sifted icing sugar in small bowl and add 2 tablespoons lemon juice and stir until you have a thick and smooth glaze. Add more lemon juice or powdered sugar, as needed.
  2. Pour the frosting over the top of the cake, allowing it drip down the sides. Let the frosting dry before covering and storing. This cake will keep for several days in an airtight container.

For some reason, I was thinking the frosting is the whipped cream, Haha! That's why I got fruit cocktails, because I was thinking it will be more yummy with fruit inside. I put too much lemon juice for the frosting and I also add the lemon zest too. Since I think it was whipped cream, i thought its too less for cake, and I add more icing sugar, beside it looks too liqud, Haha! And the result, too much frosting and strong lemon flavor! But it was taste good, because the cake not too sweet.

So, that's my second experience baking cake (the first was failed :p) and I was super Happy because my dad said its yumm! So, maybe next time, soon, will try to bake lemon cake, with the right butter and lemon curd ;)

For more information about this cake, just click here or if you need video tutorial click here.

Love, Ninu

Monday, January 20, 2014

House of Sampoerna
Did you ever hear about House of Sampoerna? Maybe first thing came into your mind is one of cigarette brand in Indonesia. Yes! But House of Sampoerna, is a museum about Sampoerna company. This place is one of Surabaya tourist attractions and you must go to this place when you in Surabaya. This place is located in "old Surabaya", this building was built on 1862 with Dutch colonial architecture and it was purchased in 1932 by Liem Seen Tee, the founder of Sampoerna, with the intent of being used as Sampoerna's first major cigarette production facility.

This place have three main part, which is central auditorium (museum), west are and east area. First impression when I enter the building is strong tobacco smells (Haha! of course). Actually I don't like this smells, makes me sick, but i this is more than just a smells. In the main entrance you will see nice fountain in front of the door, and you meet a nice staff. They ask you for your ID card, they just check if you are adult since this is cigarette museum. On the right side you will see the Liem Seen Tee's family stuff, like his working desk, some pictures, a kebaya that his wife wore long time ago. And on the left side, you will see a bags full of tobacco, a small traditional "warung" and a bike that Liem Seen Tee use.
The next room, is more like the history of Sampoerna company, there are some pictures from they important persons, there is something like printing stuff for the cigarette packing. Ow, and the toilet is on the right side of this room. The toilet was impressive, because they use the cigarette packing as wallpaper. Moving to the next room, you will find more interesting stuff, like the Indonesia map, i guess this explain about the Sampoerna's  expedition in Indonesia. On the right side of this room you will also find some stuff like a chemist bottles (I'm not sure) and an old motorcycle and a typical Indonesian street seller booth. And on the left side, there's Sampoerna's marching band stuff and the video history about it. Also you find a big old machine (I forgot what this machine use for).
On the second floor, there's a souvenirs shop and a place where you can see the worker make the cigarette, but it only on Saturday and several time, if i'm not mistaken.


The two other part of this museum, the east side, there's fancy cafe and art gallery. I don't have chance to go there. And the west side is for the family residence. On the outside you can see vintage car par on the west side.

One thing interesting about this museum, they have a program, which provide the tourist to see more about Surabaya. This called Surabaya Heritage Track (SHT). So, by join this trip, you can see some interesting places in Surabaya with unique bus. They have several different routes, depend on the theme. Usually each month they have different theme. This trip is available on Tuesday until Sunday, in three departure time. It's better do make reservation, because mostly the schedule is full, especially in holiday season. My route that day was Kampung Keraton - Cak Durasim - Kampung Arab, if i'm not mistaken. At Cak Durasim, you can see kids practice traditional dance and other stuff. Actually, I almost forgot what I saw on that day ;p so hope this pictures can explain some.
I went to House of Sampoerna two times during my on job training, it's around April - May 2014. My first visit was with my friend, and the second one to join that SHT tour. It was fun day. Hope I can go there again, maybe to have dinner at the fancy cafe with someone ;p.

Love, Ninu

House of Sampoerna
Free of charge
Address  Taman Sampoerna 6, Surabaya 60163, Indonesia
Phone      +62-31-353-9000
Fax           +62-31-353-9009
Email        hos.surabaya@sampoerna.com

Open from Monday to Sunday
Museum, Shop, & Art Gallery  9 am - 10 pm
Cafe  11 am - 10 pm

For more information, just click here.

Friday, January 17, 2014

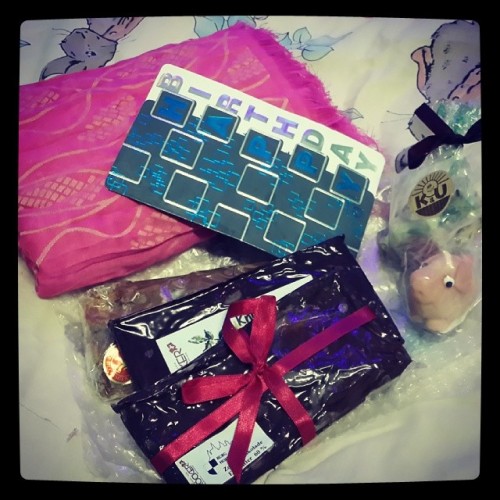
Finally i got my parcel two days ago XD I thought it was lost somewhere. This is my first time got package with stamps on it.. hehe :p Maybe that's why they took forever to deliver it. Also the postman or the custom officer seems like play soccer with it HAHA! The box is not a box anymore. But anyway, I'm happy it arrived :)
So, this is what I got from Markus ^^ ,, three chocolate plates, one small pack chocolate, a Schweinchen piggy (Glücksschweinchen), a pink scarf and a birthday card :). Those chocolate from local bakery, Hofkonditorei, RöckerI tried those three chocolate plates, and all taste yumm! Especially the dark chocolate with mint (Knusperminz), taste good and have minty cooling sensation (of course because it's mint!) and something crispy inside. The milk chocolate taste soo sweet and have the sugar decoration is crunchy, like it! And the last, plain dark chocolate, taste like dark chocolate :p But yum!

Complete package :) Look at those chocolates XD
So last night, he showed me how the chocolates looks like before he send it. It looks so pretty XD Look at the christmast decorations on it. Ow, Mr. Postman, what have you done to this cute stuff.

The chocolates shape before sent to Indonesia
The last, i havent try this cute Glücksschwein ^^ it's too cute to be eaten, Haha! But this cute piggy a little bit smashed XD It supposed to be chubby piggy.. now it's like skinny piggy

Skinny Glücksschweinchen
The angle to take pic ;p
Markus said that this piggy only available during Christmas and New Year. This Glücksschweinchen also called Marzipan, made from sugar or honey and almond meal, sometimes augmented with almod oil or extract. So, you must be wondering why piggy can be symbol of luck. A common saying in Germany is "ich habe Schwein gehabt", literally translated : I have had pig, which means I've been lucky! The saying is believed to have originated with German farm families, who counted themselves lucky if they had ad pig, which meant they would have meat to survive the winter. Hehe.. good story. So, i will try it tonight XD and I will let you know how it taste (sweet of course!) and I hope I will lucky this year :)

Love, Ninu

Monday, January 13, 2014

This morning, i got email notification from postcrossing. One of my card finally arrived safely in Austria. Kinda surprise, because i sent it on December 16th. I thought it will takes more time until it arrive, because the holiday season. So, this is my postcard that just arrived in Austria today, the Bras Basah series. This is one of my postcard design. Actually i already sent this series couple times, but for private swap. 

Bras Basah Series, now in Austria
And before that card, actually there are two other cards already arrived in Netherland. But i forgot to upload one of those card, because of my old phone was broken and i havent transfer the picture. So, this is one of those cards, Namdaemun Gate. I got this postcard while in Seoul. 

Namdaemun Gate, now in Netherland
So, there are still 3 cards on traveling and i hope they will arrive safely soon in this month. Enjoy postcrossing! 

Love, Ninu
Few months ago I got super cheap christmas light at Acehardware, its about $3, because that was last stock they have from last year christmas. So, I got this diamond shape 10 LED light with battery supply. But you know you will spend more money on batteries if u want to keep the light on your bedroom decoration. So, first thing come into my mind was, ok dad can make change the power supply. And YES! He showed me how to change it easily (without soldering!). Here are the stuff you need :


The supplies

  • Chrismast light with batteries supply
  • Extra wire, better use stranded wire like audio cable
  • Electrical tape (I don't have it that time, so I use double tape :p)
  • Unused phone charger
That's all you need! 
You must be wondering, why we need phone charger. YES! It's to change the batteries supply. Since the LED light is DC, we need inverter to change the DC supply to AC supply. And every phone charger have built-in inverter, that's why just use it. So, this how we gonna do it. 
  1. Check the light power supply specification. The light need 3 AA size batteries (1.5 volt each battery). Just look around you, any unused charger with 4.5 volt supply.
  2. Check which one is the positive (+) port and negative (-) port on the batteries supply. Then take the wire, peel of the isolator and connect the wire on the first positive (+) port and the last negative (-) port on the batteries supply (picture a).
  3. Check which one is the positive (+) port and negative (-) port on the charger. Then take the wire, peel of the isolator and connect the wire to the charger port. This positive (+) port for this charger is the hole and the negative (-) port is the outside (picture b & picture c). Seal it with electrical tape (I use double tape) to secure the wire.
(a) Wiring on the batteries port
(b) Connect the wire to positive port

(c) Connect the wire to negative port
(d) Seal it with tape

Done! So easy right? You just need to make sure that every wire connection is connected! Here is the result. They now in my bedroom hanging with my postcards collection.

The result!
Love, Ninu

Friday, January 10, 2014


So, few weeks ago i got a chance to visit this place called Kawasan Wisata Pendidikan Lingkungan Hidup (KWPLH). This place is located 23 Km north of Balikpapan in East Kalimantan (Borneo), Indonesia. Actually, this is not my first time going there. First time i went there was around 2003, because i had some outbound activities in my school at that time. When you arrive there, you will find a giant sun bear on the main entrance. Why? Because this place is a Sun Bear conservation :) I was surprised when i got there, the place lot better than last time i went there and the best is that they don't put the bear in cage anymore.

So, let just get started! This place have some facilities, such as Sun Bear Enclosure where you can see the bear eating, Cat House, Sun Bear Education Exhibit, Endemic Wildlife of Borneo Education Exhibit, and Forest Function & Ecosystem Education Exhibit. Too bad, i'm too lazy to check on the exhibits. 

This is my first time seeing that sun bears eating ^^ so we have to walk on wooden bridge to see the bears. They have two watching place, up stairs and down stairs. But mostly people will look at the up stairs because it's close to the bear cage's and usually the bear start eating from there. They put the food all over the place, so you can see the bears seeking for their food.

Up stairs watching
Down stairs watching
Main entrance
Sun bear eating
Donation Box

They eating!

They have 6 Sun Bears in there. All those bears was saved from the local people who treat them badly. That's why they make this bear enclosure, because all those six bears can't go back to wild life anymore. One of the guide told me, the local people torture them, like put them in small cage, chained their body, hurt they eyes, and so many horrible thing happens to them. But now, they live happily in this enclosure :) Ow, they also have adoption program for the bear.

Adoptions Board
So, this is the end of my trip. I hope this post will help give more information to anyone who want to visit this place :) Have a nice weekend!

Love, Ninu


Operational time :

Open Daily, 9 a.m to 5 p.m
Attraction : Sun Bear Feeding at 9 a.m and 5 p.m
Fee          : free of charge (only pay for parking)
Address   : Jalan Soekarno-Hatta Km. 23 No. 185
                  Kelurahan Karang Joang
             
More information click here.

Thursday, January 9, 2014

Chungmu Kimbap (충무 김밥), my version

Chungmu Kimbap, i found this recipe on Aeri's youtube channel. Because it looks similar with the one i tried when i was in korea, but i dont know the name :p Chungmu kimbap is a local food from a city called Tongyong. The city was named "Chungmu" when this food invented, so i guess you know why this food name is Chungmu.
So, last weekend, i decide to make it. Let's get started with the  recipe first!

Main Ingredients
  • 4 Cups Cooked Short Grain Rice (1//2 tsp Salt + 2 tsp Sesame Oil)
  • 2 Generous Cups Korean Radish (10 oz)
  • 2 Medium Squids (12 oz)
  • 4 Sheets Dried Laver/Gim/Nori
  • 1/4 Cup Green Onion
  • Some Extra Sesame Seeds (Garnish)
Brine Ingredients
  • 1 Cup Water
  • 1/4 Cup Vinegar
  • 1/4 Cup Sugar
  • 1 Tbsp Salt
Sauce Ingredients
  • 1/4 Cup Hot Pepper Powder
  • 1 1/2 Tbsp Soy Sauce
  • 1 Tbsp Water
  • 1 Tbsp Sugar
  • 1 Tbsp Sesame Seeds
  • 1/2 Tbsp Fish Sauce
  • 1/2 Tbsp Vinegar
  • 1/2 Tbsp Sesame Oil
  • 2 tsp Garlic, Minced
  • 2 Pinches Black Pepper
Directions 
  1. Obtain about 2 generous cups (10 oz) of Korean radish. Cut it into bite-sized pieces.
  2. Combine all the brine ingredients (1 cup water, 1/2 cup vinegar, 1/4 cup sugar and 1 tbsp salt) in mixing bowl. Stir it until the sugar and salt dissolves. Add and mix the radish into the brine mixture.Set it aside for about 45 minutes to pickle the radish.
  3. Mix all the ingredients for the sauce in mixing bowl (1/4 cup hot pepper powder, 1 1/2 tbsp soy sauce, 1 tbsp water, 1 tbsp sugar, 1/2 tbsp fish sauce, 1/2 vinegar, 1/2 tbsp sesame oil, 2 minced garlic and 2 pinches of black pepper). Set it aside.
  4. About 45 minutes late, drain the radish. Do not rinse the radish pieces.
  5. Obtain 2 medium-sized squids. Cook the squid in boiling water for about 5 minutes on medium-high. After 5 minutes, drain the squid and cut into nicely sized strips for eating.
  6. Put the pickled radish, cooked squid and the sauce in mixing bowl. Mix everything to get everything evenly covered with the sauce. Add 1 tbsp of sesame seeds and 1/4 cup green onion and mix gently. If you want some more sesame oil flavor, you can add a little more in this step.
  7. Add 4 cups of cooked short grain rice, 1/2 tsp salt and 2 tsp sesame oil into mixing bowl. Mix it gently. 
  8. Obtain 4 sheets of roasted dried laver/gim/nori. If you laver is not roasted, you can roast it at home. To do so, preheat a pan without oil on medium and then place each sheet in it. Once it is preheated, reduce the temperature to medium-low. Flip the dried laver quickly - only few seconds - several times to roast it evenly without burning. Stack new sheets in the pan, and repeat.
  9. Cut the sheets in half lengthwise. To do it easier, stack all 4 sheet together, and gently fold them in half to make a guideline and then cut it by following the line with your scissors.
  10. Place one piece of dried laver on the bamboo mat. Spread about 1/2 cup of seasoned rice on the laver evenly. Leave little bit of space at the end of the dried laver, so when you roll the laver with rice, the rice will not come out of the laver. Roll the kimbap with a bamboo mat and gently squeeze it to make it stay firm. If you want, cut a little bit off both ends of the kimbap to get a nice sharp end. Then, devide each roll of kimbap into 3 to 4 pieces, depending on your desired size. 
  11. Serve it in place with the squid. Done!
In my trial, i skipped some ingredients (because i forgot to buy it). So i skipped the radish, fish oil and green onion. Also, i use the laver wtih original flavor from snack pack, because i can't find the regular one for cooking.  Oh, and i also use long grain rice :p that's why it's messy. For detail instructions you can see it on the video below, or check aeri's blog.  Happy eating!

Love, Ninu

Wednesday, January 8, 2014


Hello Crafter ^^ So, today i decide to post something about DIY. I found this printable stuff while browsing on Jessica Jones  blog long time ago. This super cute printable Owl bookmarks is made by Irene at Gi Det Videre. They are available in four nice colors and come with a card. Now she just update the card design. You can download the original owl design by Irene in here, for the family owl tree card by Irene (left) here. and the triple owl card by Lucy (right) here

New card design by Irene (left) and Lucy (left)
Is it cute, right?? Happy crafting ^^

Love, Ninu
Hello Explorer!

So, today i'm going to tell you something fun to do while you in Bandung. Do you want to see something unique? I suggest you to go to Geology Museum! Yes! A museum, I love visiting museum.  Even only once i went there, but i really like that place. Geology Museum is located in Jalan Dipenogoro No. 57, Bandung. This building is near from Gedung Sate, about 5 minutes walking. 
Geology Museum was build on May 6th, 1962. The museum open at 9 a.m to 3 p.m from Monday to Thursday and at 9 a.m to 1 p.m on Saturday and Sunday. On Friday and national holidays, the museum closed for objects collection treatmentsWhen i visited, too bad the museum was under renovated in some area (it was about 6 years ago ^^). So, maybe now it looks better. 

That's me, 6 years ago in front of the main entrance

This museum have 2 floors. On the first floor, divided in 3 rooms, which is orientation room, west wing room and east wing room. On the second floor, divide in 3 rooms, west room, middle room and east room.

Rex trying to eat me :p
For me, the fun place was the east room in the first floor. They called it as the Room of History of Life. Why? Because in this area you can see the earth conditions around 4 - 5 billions years ago. In this area you will find lots of fossils, but this one is the very attractive one. The Tyrannosaurus Rex Osborn, 19 m lenght, 6.5 m height and 8 ton weight. Even this is just a replica, but this is awesome!
There are many other interesting fossils in this area, such as snake, elephant, rhinoceros, buffalo, etc.

Some Fossils in Geology Museum
Other fossils,  i guess it snake fossil
On the west side on the first floor you can see the Indonesia Geology. There are some booth that explain some good information, such as the movement of active earth plates, geological condition if Sumatra, Java, Sulawesi, Maluku Nusa Tenggara and Papua. There are some rocks and mineral resources from all over Indonesia. And also you can see the visualization of volcanoes in Indonesia, such as Tangkuban Perahu, Karatoa, and Merapi.
I don't know what it is, but i guess it's a stone :p

Stones

Mountains Replica

There are more interesting stuff on the second floor, but too bad i don't have the pictures. So, i guess you have to go there and see it your self ^^.  Ow, one thing, there is one interesting stuff outside the museum. They make replica of oil machine or something (i don't know the exact name) and it actually moving like the real one. 

The Machine
So, this is the end of the story. I know i didn't give much informations, but it just because i visited this place 6 years ago >_<. Maybe, if i have a chance to go back to Bandung again, i will go there and give more story to you. For more information, you can check the details information on this link.

Happy Exploring!
Love, Ninu