Tuesday, April 29, 2014


Long time ago, I got a dress, which I think it look nice. This yellowish batik dress, actually look gorgeous on the mannequin, lol. I like the pattern and the color combinations, but I rarely wear it (only two times since I got it). It is absolutely way too big for me, even the obi help to hide the big size. And the worse, it's too long for my height, lol. Make me look more short XD. So, I think I should do something with this dress, or else I would never wear it again. Mum suggest to give elastic band on the waist, so the dress will fit me and the obi didn't move around.

One day, I was looking for sewing tutorial and found this lovely convertible dress idea, from extrapetite.com. I was thinking this idea will be great for that yellow dress. I was too afraid to cut the dress into two part, so I start with trying to put zipper on the left side of the dress. I want to see how it looks like when it body fit. 

First time putting zipper, messy ;p
2nd time, better
Just add zipper on the side
Here's how it looks like after I put the zipper. Look better! So, I decided to reconstructing this dress. First, I have to measure the skirt lenght, and how much fabric I have. And have to measure the pleated size, so I don't make mistake when I cut the dress into 2 parts. 


After getting 2 pieces of the fabric, I just follow the instruction just like when I make my pleated denim skirt, in the other post here. I use the oby as the waist band, so it will match with the pattern on the arm. And here's the transformation look. More fit to body, and the important thing is not make look drowning in it ^^. 

The transformation

Since this is convertible dress, I can wear it with another top, just like this one, with black t shirt. 
with black tshirt

With a black belt


So what do you think? Need to do reconstruction to old dress? ;)

Love, Ninu


Thursday, April 17, 2014

It's long weekend again! I love my country ^^ many holidays, haha! So this week, finally some of my postcards reach the destinations. Actually only two out of nine XD arrived this week. The travel time is about 28 - 30 days. Ugh, super slow even I put more stamps on it.

So, this is the first one who arrived, the Owl postcard reach Boston in 28 days. This is one of my design, and I really like it. I'm so happy when I got message from Brittney, because she really like this postcard. I check on her profile, and she loves owls, that is why I choose this postcard for her.


The second one, is a private swap with Ana, the lovely lady from Portugal who sent me a nice cork postcard last month. I sent her one of my favorite travel postcard, the Bras Basah series, that I design. But she said it's a little injure when she got it. Maybe I should ask her to take picture of it, so I can see how bad it is. But this the postcard I sent her.


So, I think I should send some postcards this month. I hope I don't get to lazy for that XD

Happy postcrossing!
Love, Ninu


Tuesday, April 8, 2014

Plant Vs. Zombie Family
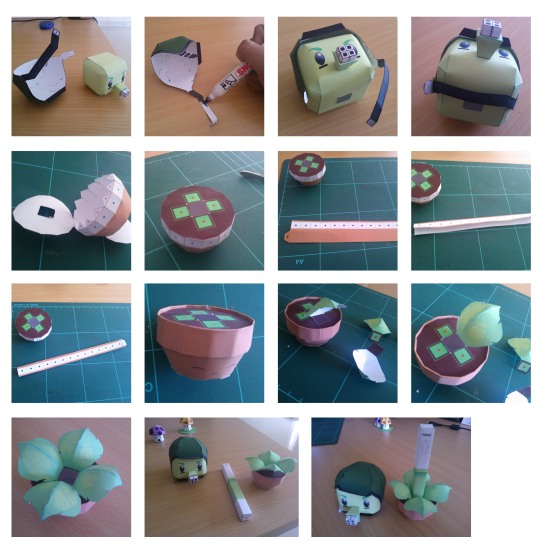
I was looking for green decoration for my working desk, and i found this super cute printable Plant Vs. Zombie paper craft. I found this stuff on Blank's blog, yes the author name is Blank, and he/she come from Bandung. I'm so proud to announce that this paper craft designed by an Indonesian :)

Isn't it cute? Plant vs Zombie family (even it's not complete ;p) You can print the Gatling Pea here and follow the instruction just like the picture below. The Sun Shroom and Puff Shroom also include in this PDF file.

Image  Source
And, last but not least, you can download Peashooter here and Repeater here. If you confused, just follow this instruction form Blank below. It's super easy!! Have fun!

Image Source


Love, Ninu


Saturday, April 5, 2014

Yuhuuuu..I can smell weekend is coming ;p This week was really hectic for me. I have to organize lots of stuff at work. From checking the printer, calling the internet technician, which I already requested for more than a month XD, preparing adding new phone line at office, sending those two big packages to Jakarta, arranging car for our technician because he need to take some tools, acetylene and oxygen tube to the customer, follow up PO and many other things I can't remember.

I know I easily forgot stuff, that's why if I have much task to do I usually write it down. I've been wanting to have nice to do list for a while, because I know it help me to not forgetting stuff and be more organize. So today I found some nice free printable to-do list.

The first one, is from Cyndy's blog, you can check her post here. I think this one will use for my daily things to do since morning until I sleep. It looks nice, with the chevron pattern on top and bottom part. Also, I think the mini list in this to-do list is more complete than other to do list I found. It's perfect for daily using. You can download this pretty PDF to do list here and  print it on A4 copy paper. If you want the binder size one, you can download here.


The second one, is GET It DONE list from Invicible Inc. This one is weekly to-do list, and perfect for me, to cover everything I have do at work. I also like the simple design and it's blue! Hehe. The to do list from Monday to Friday, I think it will help me to remind what I should done every single day. The weekend part, I think I won't use it, because it's day off. This month part, is really perfect, because it help me to remind everything that must be done every month. And eventually part, I fill it with the goal for every month.


The best thing about this printable, you can type your schedule before you print it, if you want to make it look tidy and write the rest additional things to-do. You can download the Get it Done PDF here and print it on A4 copy paper.

I'm thinking to print both list on photo paper or glossy paper so I can use it over again. Don't forget both printable are in PDF, you will need adobe reader to open the file. Happy organizing!

Love, Ninu


Wednesday, April 2, 2014

Lately, I feel more comfortable to wear girly outfit. Haha! Maybe because I gain weight ;p and my jeans a little too small for me. I have some mini dress, but I was thinking I can't always wear dress to work, I need skirt. Yes! I want skirt for sure, and wear it with plain shirt or something.


So, few weeks ago I've been looking for skirt sewing tutorial for while and found this two tutorials, DIY Pleated Flare Skirt and Easy DIY Elastic Waist A-Line Skirt with Pockets. Both are nice! I check at home, and Mum only have denim fabric. I want the pleated look with pocket on my skirt and I to use invisible zipper, instead elastic band. So, I decide why not combine it.

So, here's the supplies :
  • 1 yard Denim Fabric
  • Invisible zipper
  • Sewing supplies (thread, scissor, straight pin, marker)
  • Sewing machine
  • Overlock machine (additional)
I'm so lucky, because Mum used to sewing long time ago, so we have old sewing machine and overlock machine ^^. Back to business, I follow the instructions to make Pleated Flare skirt, on joy and cheryl blog. But I cut in half the main piece for skirt, because I want to insert the pocket. So, there are four main part for this skirt.


  1. Two pieces of main skirt
  2. Two pieces of  waist band, in that picture above, I already sew those two part of the waist band.
  3. Two pieces of the pocket part (i forgot to take picture of this part)
Ow, before cutting the fabric, you should measure it correctly. Here's the guidance how you should measure your fabric.


The first thing to do after cutting is sew the pocket pieces with the main pieces of the skirt. You can follow the tutorial in here. Sew the pocket piece with the main skirt piece, just like on tutorial from extrapetite.com , repeat for the other piece. After that, I did overlock the every part of it.


 Now, it's time to create the pleats. Again, you have to measure it correctly so it will look nice. Here's the guidance to measure the pleats. Once you know the measurement, you can start measure the fabric, pin it and then sew to secure it.


 So, here is how it look when you done with the pleats.


The next step is gather the skirt piece with the waist band.


Next, putting the zipper. This is the harder part XD I never sew a invisible zipper before, so this is like trial. First, pin the zipper in different direction (I don't know how to explain it, but you can see it in the picture ;p), then sew it each part.


Since this is my first time, there must be mistake. I did try to fix it, but still wrong, haha! Look, it didn't match, lol. I don't know whether I sew the zipper incorrectly or I cut the waist band in wrong measurement, hehe. But who cares, noone will notice. So, I continue it and sew the waist part (again! forgot the picture ;p).

This is the last step, do the blind stitch for the bottom part of the skirt and you are done! For more details, just check the tutorial here. Sorry for my bad English, I'm trying my best to explain it ;) Good luck!

Love, Ninu